Also Featured on Hack A Day! Wow! I’m flattered!
If you live anywhere in the world (except the US maybe) you may have seen one of these:
You can seem to find them in any place that sells imported crap from China, usually along with more traditional Famicom clones like the Polystation with its countless variations and piles of pirate cartridges. They can be yours for 10 to 20 US dollars, complete with two joypads, a light gun, a mouse and an operating system cartridge.
These are basically another Famicom clone with a keyboard built in. They tend to come with “educational” software like typing and math games, sometimes they even come with a mediocre knockoff of a popular graphical operating system like Microsoft™ Windows, and of course a plethora of unlicensed 1st generation Famicom games.
One of the peculiarities is that they usually come with word processing software. If you’ve actually used it you’ll notice that the software contains a Print option in its menus, and if you select it the computer seems to try to establish a connection with a printer. You might be wondering why is that even there, since these cheap computer knockoffs don’t have any means of interfacing with other devices save for game controllers (they can’t even save your data!). You might have heard vague legends about some of these machines actually having a built-in printer port, but they’re nowhere to be seen. Until now!
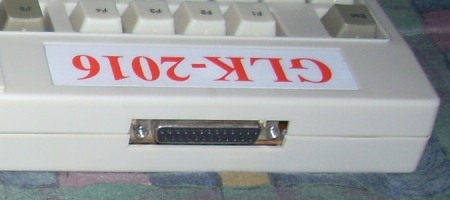
I managed to score this one in 2008 for the whole sum of US$2 by wandering around on a local street market. It didn’t come with any hookups, controllers or software but I was able to get those pretty quickly. It seems like your average vanilla Famicom Keyboard clone, until you take a look at the rear ports:
Power input, A/V outputs, RF out and… DB-25 parallel port?!
This is one of the legendary Famiclones with printer ports! I hooked it up to an old dot matrix printer that had a standard PC parallel port interface and I was able to print out text from the word processing software. I even recorded a video of it in action and uploaded it to YouTube. Here it is, printing text in all its 8 bit glory:
This is really cool for a crappy clone of an 8 bit gaming system that took over the world and that I happen to love so much, but aside from the cool factor the usefulness of this is pretty limited. The computers are packed with crappy software, they don’t have any means of saving user generated data and the word processing software is primitive at best. It’s a cool little gadget if you’re into retro gaming and pirate crap, but aside from that it spends most of its days in storage.
Then I stumbled across the PLAYPOWER Project, a global open source community that aims to create useful software for these Famicom clone computers as a means to bring computer literacy to the emerging middle class in developing countries, by taking advantage of the ubiquity and low price point of these devices. Coupled with the right software, these inexpensive machines could become effective learning tools and help transform the economy of developing families around the world. Here’s a 5 minute video that explains everything in great detail.
Actually, I didn’t stumble across the project. I was contacted by Derek himself through a YouTube message. He asked me if I would like to get involved in the project, and sure I’d like to! But I’m not a programmer or a graphic designer or a learning specialist. My skills are hardware and electronics oriented. One of my hobbies is retro gaming, with a special interest (or should I say obsession) on the Nintendo Famicom. There must be something I could do for such a great project. It got myself thinking for a few days when I finally remembered about that Famicom keyboard clone with a printer port that I have somewhere.
Printing on the $12 computer?
As useless as it might seem, having a means to connect a standard printer could be a great enhancement to these cheap 8 bit computers. If you don’t have access to word processing, being able to type and print out your resume in one of these could make a big difference in getting you accepted for a job, for example. We tend to take word processing for granted these days, it has become such an integral part of our lives, but it’s still a luxury for a large portion of the world’s population. I’m not that much of a writer, but even I’m able to notice that a computer can help you set your creative mind free, as some sort of ‘mind accelerator’.
Technically speaking, the printer interface is an addon to the standard Famicom core system. Since the Chinese manufacturers’ ultimate goal is to keep costs down, the interface is probably done in the simplest way possible, with a minimum of external components and most likely doing the bulk of the work in software. Unfortunately it’s not very easy to find keyboard Famiclones with printer ports, and thus there’s no information about their inner workings. Since I own one of these and I have the knowledge and the skills to reverse engineer the printer interface, I can come up with detailed documentation that could prove to be very useful for the PLAYPOWER project.
Getting to know the interface
Based on my previous assumptions, by removing the cover of the keyboard Famiclone I should find a simple electronic circuit to interface the printer port with the main system, using the bare minimum of hardware components and most likely doing the communication protocol in software, in order to keep costs down.
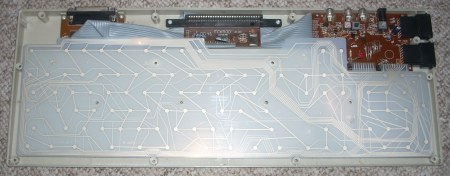
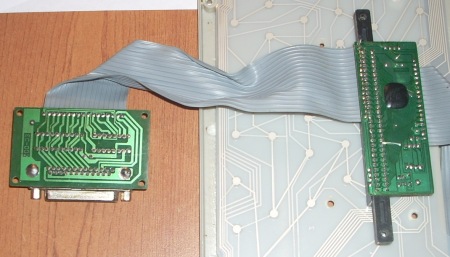
The main Famicom board is in the center, the power, video and keyboard interface in the far right and the printer interface is in the left side of the machine, interconnected together by ribbon cables of various sizes. The keyboard itself is a standard conductive membrane matrix, just like in any modern PC keyboard. Let’s take a closer look at the printer interface:
Turns out I was right! The interface was done in the simplest way possible! The hardware itself consists of two standard TTL logic chips and one capacitor, and it communicates with the main Famicom board using the same data and control lines used by the game cartridge slot, eliminating the need for costly expansions to the base hardware.
Further analysis reveals that the chips only buffer the data from the CPU data bus and make it available on the parallel port, proving my theory that most of the hard work is done in software. This is great news for the PLAYPOWER people. The port is completely software controlled, this means that a programmer can take advantage of it and design a better featured word processing software (with the right code it could even print out graphics), or even create programs to interface with other kinds of hardware besides printers!
After a couple of hours of probing around with the multimeter and drawing terrible diagrams, I was able to come up with a full schematic of the interface and some basic notions of how it works on the software side.
A non-messy version of the schematic and full documentation follows.
Famicom Compatible Printer Port Interface
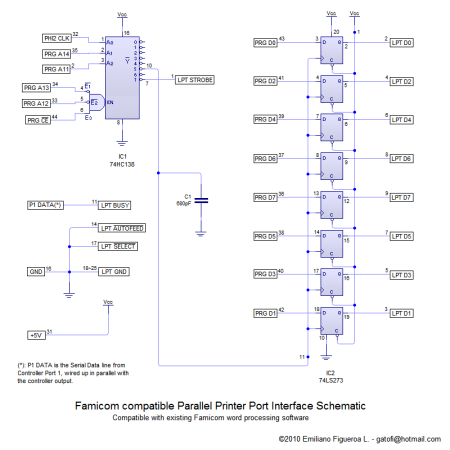
Here’s the full schematic of the hardware interface:
Pin numbers on the signal lines correspond to the Famicom cartridge port, unless noted with the LPT prefix, in that case they correspond to the pins on the DB-25F connector. Complete pinouts and more info can be found here:
There are two glue logic chips in the interface. IC1 is a 74HC138, which is a 3-to-8 line multiplexer with inverted outputs and multiple enable pins. This is used as an address decoder for the parallel interface. IC2 is a 74LS273, which is an octal D-type flip flop with common clock and clear inputs. The flip flops store the actual data that goes into the printer port, as instructed by the address decoder logic. Given the intrinsic characteristics of the flip flops, the port is strictly unidirectional.
Clocking the flip flops stores the currently present byte in the PRG ROM data lines and makes it available on the parallel port’s data pins. To avoid ‘garbage’ data from reaching the port, the flip flops are clocked only under certain conditions. The 680pF capacitor seems to smooth out possible glitches in the clock signal.
In order to drive a standard PC parallel printer, the data byte must be made available on the data pins, the Busy line (Pin 11) must be monitored to check if the printer is busy (if it is it won’t accept any data). If the printer is not busy, then the Strobe line (Pin 1) goes low for a short time to signal that a valid byte is present in the port. The printer will indicate that it is busy processing data via the Busy line. Other control signals exist but these are the bare minimum to engage a successful communication between computer and printer.
The address decoder responds to two specific patterns in the CPU address range, by monitoring the highest address lines (A11 through A14), the PRG /CE signal and the Phi2 clock signal. One address will clock the flip flops in IC2, storing the current data byte and making it available at the printer port, this will be called writing to the port from now on. The other address produces a low state in the Strobe line, in order to signal the printer that there’s valid data in the port, this will be called strobing the port. Here’s a clever bit of Chinese engineering: The monitoring of the Busy line is done by the Serial Data line from Controller port 1. Since this pin is an active-low input and the Busy signal is active low too, it seems like a perfect candidate for the job. Pin 11 of the printer port thus hooks up directly with controller 1’s data input. Other lines like /Autofeed and /Select are permanently tied low at the DB-25F connector. The rest of the control lines are simply left unconnected.
In order to write or strobe the port, the following conditions must be fulfilled:
- PRG A12 and A13 must be low.
- PRG /CE must be high (ROM access needs to be disabled to avoid bus conflicts).
- Phi2 clock must be high (I think this is related with how the CPU accesses data from the bus).
PRG A11 and A14 are used for the actual address decoding. The actual port addresses are:
- $800 – Write to the port.
- $4800 – Strobe the port.
Address lines A0 through A10 are ignored by the interface, so the actual address ranges for write and strobe are $800 to $FFF and $4800 to $4FFF, respectively. Both fall well under the PRG ROM address space. I’m not a NES developer so I’m not fond of the intricate details of the Famicom CPU addressing space, but it seems that both of these addresses are unused in standard conditions.
A write to $800 will store the current byte on the CPU data bus and present it to the parallel port, a write to $4800 will assert a Strobe (pull the line low). A write elsewhere will de-assert the Strobe (pull it high), and checking the state of the Busy line is done by reading Bit 0 of $4016 (Joypad Input Register 0).
Notes about the Interface: It has been observed that plugging in the printer sometimes disables operation of the keyboard and possibly the controller. I haven’t investigated further but it seems that it’s due to the Busy line keeping the controller data pin low. In that case, a switch could be fitted to disable this pin but a simpler solution is to plug in the printer only when you’re going to print something.
Conclusions
And there you have it. An 8 bit parallel port with two control lines and the communication protocol totally done in software. With the information above you could perfectly implement a parallel port for connecting a printer into keyboard Famiclones without the port built-in, other types of Famicom clones, an original Famicom or even a NES (though the usefulness of the latter is really questionable). Given the electrical characteristics of the interface, a cartridge pass-through adapter could be designed to add printer port functionality to any Famiclone computer just by plugging it into the cartridge slot, putting the game cartridge on top and running a cable to the first controller port.
For the programmer types, it gets a whole lot more interesting. Having total control over the comm protocol, there are no hard limits on what can be done. A ‘better’ word processor could print out more than just plain text. Software could control other things besides printers. A bit banged serial interface could be created by using the Strobe line and one or two data bits. Bi-directionality can be provided through the Busy input. This has the potential to be the solution to the problem of not being able to save user data on the computer. Hobbyists have been using comm ports to control various devices since the dawn of computing, this could be “The” port that would enable the same for the $12 computer platform.
My best wishes to the PLAYPOWER project. This was just my two cents to help build a better world 8 bits at a time! But this is only the beginning, I’ll be contributing to the project in any way I can!


21/03/2010 at 4:55 AM |
Excellent work, as always 😉
21/03/2010 at 11:13 AM |
Amazing.
28/03/2010 at 6:13 PM |
awesome you’re sharing electronic schematics, so maybe we can hack other famiclones to allow this! thank you! 🙂
28/03/2010 at 6:45 PM |
let’s see how far can we make ‘noacduinos’ from famiclones in a close future! 🙂 – btw, this blog post shows to us we can do almost anything from the 6502 limitations, and the creativity is the limit! 🙂 amazing! 🙂
28/04/2010 at 8:18 AM |
Hi
could You please make a detail photo of the printer-expansion PCB from the bottom (solder) side? I would like to reproduce it 1:1 for my GLK-2001 famiclone… Many thanks!
28/04/2010 at 2:55 PM |
Here’s the best I can produce at the moment. Hope it helps!
29/04/2010 at 1:13 AM
Hi! Thanks that should do it! Now to find my old printer… 🙂
29/05/2010 at 2:45 AM |
Another excellent hardware hack as usual, 133MHz!
I have a somewhat related comment: As you said, non-printer devices could be designed to attach to this simple “strobed 8-bit output port”. This makes me think of the USB->LPT adapters on the market. They’re not as handy for hacking as the “FTDI” serial adapters, but I wonder if they could be used in a way similar to your NES port.
I don’t have one to test on, but if anyone has done extensive testing on one of these (such as writing software in libusb), and knows some of the features/limitations, please post a comment.
30/09/2010 at 3:05 PM |
[…] and set of applications. Seeing a standard DB25 port on the back [133MHz] wondered if he could make the system talk to a printer. His first step was to investigate the electronics inside to find that the connector has a couple […]
04/10/2010 at 7:17 PM |
hi i just wanted to know where did you get one b/c im interested in owning own to hack it! 🙂
25/10/2010 at 2:47 PM |
I exceptionally enjoyed this read. Keep up your nice work.
30/10/2010 at 2:17 PM |
[…] and set of applications. Seeing a standard DB25 port on the back [133MHz] wondered if he could make the system talk to a printer. His first step was to investigate the electronics inside to find that the connector has a couple […]
18/01/2011 at 10:38 PM |
I have a GLK too. It’s an older model, but it’s almost the same.
I want some help if you can. The controllers aren’t working anymore. I tried to modify a NES controller connecting the 5 wires to the respective pins, but only the “A” button works. I wanted to revive old times…
18/01/2011 at 11:52 PM |
Where can I buy one (online) that has a printer port? I haven’t seen famicom clones for a long time in my country selling on stores.
19/01/2011 at 11:41 PM |
If only “A” works, it usually means the clock line isn’t connected right. I think the standard color for this wire is yellow, but it might be different if you have a 3rd party controller. Anyway, I hope this at least gives you a place to start your debugging…
09/02/2011 at 12:30 AM
thanks. to make it work I wired the clk wire to the pad2 port and it worked. but now some games work with the gamepad and others don’t. this is weird. I tried evey combination of wires data/clk/latch from both ports, all other combinations only one button worked or none. almost all games work with the pad but super mario is one of them that doesn’t work.
09/02/2011 at 12:38 AM
(Why do threads have such a shallow maximum depth?)
@VSpeed: It looks like the clock line to port one is damaged 😦 The reason some games might not work is that they’re only turning on the clock line on port 1, so your port 2 hack won’t work. You’ll just need to debug port 1 and hope it’s something external to the CPU (like a broken trace, bad resistor, etc.)
Hope you can get it working…
04/03/2011 at 8:21 PM |
hello i have the model computer glk – 2001!
and i not have the programm cassettes and controler…
08/04/2012 at 7:05 AM |
this is cool keep up with the work. And more over i will like to know if without the catridge the deviice can not display anything on the screen thanks
11/07/2012 at 5:27 AM |
[…] ca existe, et il y a même des hacks de ces matériels. Outre le fait que ça me rappelle furieusement les MSX du début des années 80, […]
15/04/2013 at 5:03 PM |
This is great info. I was wondering if anyone knows what’s happening with the Playpower.org people. Their website has seemed static for years, broken links, etc.
From what I was able to gather, are they using these famicom clones systems to teach people how to program in 6502 assembly language?
That is an awesome idea that I would like to support, however when I click the “join” link on their website I get a 404 page.
If anyone can offer any info I would sincerely be grateful,
Tony
05/08/2013 at 6:18 AM |
I found your Youtube video about 8×8 led matrix scroll controlled by parallel port of PC. Really a great video, a very good post. I wonder if you would share on how to do that here …. I have an old 133Mhz Pentium ignored in the garage for years, it may work again in your way at least. Thanks.
14/04/2018 at 12:45 PM |
Thank you for that, I found this page by luck and it blessed me a lot.
actually I owned a GLK-2010 when I was a kid from a 20 years ago and I wondered about the programs on cartridge which have a print commands plus I read about it in the device manual came with it which pointed at the parallel port in the device which was not there just blocked by plastic cover and which supposed to be used to attach the printer . unfortunately back then the keyboard keys stopped working and I opened it without figuring a solution leaved it parted . Now after I saw your article I searched for my device in my place collected its parts and managed to fix its keyboard by figuring out the faulty IC in circuit and I was amazed when it worked after replacing that IC thanks to my engineering study. And now after all of that I am excited to make that Parallel port interface ,so thank you again.
Thank you for that, I found this page by luck and it blessed me a lot.
actually I owned a GLK-2010 when I was a kid from a 20 years ago and I wondered about the programs on cartridge which have a print commands plus I read about it in the device manual came with it which pointed at the parallel port in the device which was not there just blocked by plastic cover and which supposed to be used to attach the printer . unfortunately back then the keyboard keys stopped working and I opened it without figuring a solution left it parted . Now after I saw your article I searched for my device in my place collected its parts and managed to fix its keyboard by figuring out the faulty IC in circuit and I was amazed when it worked after replacing that IC thanks to my engineering study. And now after all of that I am excited to make that Parallel port interface ,so thank you again.
I have draw the PCB LAYOUT and I would like to share it for who want it to build his own.. you will find it in the link : https://drive.google.com/open?id=1DuFdKW799f52BvW_ncyv-E2aGZoiJnsm