Last Sunday I was checking out the Buy/Sell/Trade section of one of my favorite Internet communities besides Famicom World – RetroGames.cl Forums. Some guy was selling a bunch of gaming stuff for cheap, and I was fortunate enough to see the post just minutes after it was created, giving me the ultimate lead to snag stuff before anyone else.
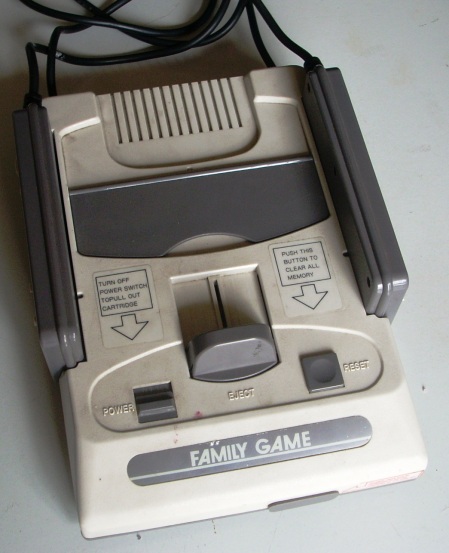
Among the stuff that I bought from him, I got this nice looking Famiclone for about $5, system + box + manual, untested.
I like these Famicom-shaped clones, and this one is in fact my very first one. I couldn’t resist getting it even if it was in rough/unknown condition, since these clones have several advantages over the newer ones.
This one is a Family Game, manfuactured by NTDEC. Family Game is a generic term used in Argentina to describe Famiclones, but this unit seems to be manufactured for a NTSC market. Judging by the box and the shape of the console, this Famiclone is very old, from the earlier batches of Famicom clones. Because of its age, it probably uses a discrete design (instead of the System-On-A-Chip ASIC used in modern clones) that clones the entire Famicom motherboard and thus isn’t plagued by the problems that modern clones have, like incorrect colors/sound or incompatibility with certain games. As a Famicom collector, finding one of these is really sweet!
Box is in rough condition, manual is in great shape (it’s in Spanish and it seems to be a blatant copy of the original Famicom manual, down to the HVC codes!) and the system itself is in pretty good condition, just dirty.
This is definitely one of those early Famicom clones which had an exact copy of the original Famicom’s motherboard. The only cloned chips are the CPU and PPU, which in this case bear mysterious markings. Good thing is that the CPU and PPU are socketed, which means that they can be replaced with original chips taken from a NES motherboard for 100% accuracy and compatibility!
Dirty Famiclone was begging to be cleaned, so I took it apart to the last piece and gave every plastic part a good, warm bath and a good scrubbing with a toothbrush dipped in Cif (a mildly abrasive cleaning product), and here’s how it turned out:
Now it’s time to hook this bad boy up to the TV and see if it works. And it doesn’t. It displays a black screen and doesn’t run any games. Closer inspection of the cart slot reveals this:
Talk about abuse! And it was even worse! I took this picture after trying my best to realign every bent pin with a jeweler’s screwdriver. Even after that it wouldn’t boot cartridges. I was suspecting that something else was faulty…
Fortunately when wiggling the cartridge around and repeatedly pushing reset, it displayed a colorful glitchy screen. The fact that it was colored means that the system clock generator is OK, and the random garbage on the screen proved that the CPU and PPU are doing something, which means that the rest of the system is fine and the cartridge slot is the only culprit.
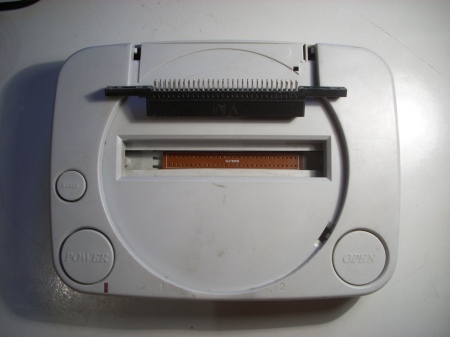
This only leaves one option: Replace the 60 pin cartridge slot. Where to get one? From another Famiclone, of course! These two were excellent candidates as organ donors for the 60-pin transplant:
The clone on the left is completely broken, and the one on the right works fine but it’s really crappy (not that I’d expect much from a Polystation Famiclone…). In the end the Polystation was chosen as the donor just because its cartridge slot was in better condition.
Desoldering a 60 pin card edge slot isn’t terribly hard, but it’s really tedious. You have to suck the solder off those 60 little pins with a desoldering pump, repeat the process for every pin that didn’t loosen up completely, and then do it again!
After goofing around for quite some time I finally got my lazy ass moving and started desoldering the donor cartridge connector.
With a fresh replacement in hand, it’s time to remove the broken slot from the Family Game and install the working one in its place.
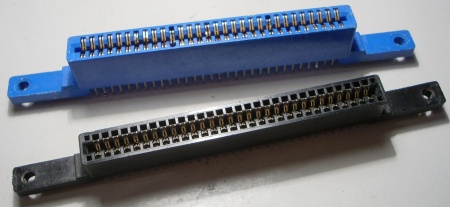
It turns out that the black cartridge connector is slightly shorter than the blue one. I know that the Chinese pirates cut corners everywhere they can to mass produce these clones as cheap as possible, but I think this is going a little too far!
Time to solder the replacement connector!
It’s a good idea to solder the four pins on the outermost corners first. That way you can easily fix your alignment before it becomes a potential screwup.
Success! Time to put it back together and fire it up.
It verks! it verks!
Replacing the cartridge connector brought this Famiclone back to life for once and for all!
Now that it’s booting games perfectly, I could do my battery of Famiclone Quality Tests which consist on detecting sound/video flaws and trying to boot the Famicom Disk System and Castlevania III. Unfortunately, despite being a discrete Famiclone with separate CPU and PPU chips, it suffers from incorrect audio registers like every NoAC based clone out there. On the other hand, no video/color flaws were present. Colors are as good as the real thing, and it seems to replicate all of the original PPU’s quirks. Even better, it passes the FDS and Castlevania III tests with flying colors! The vast majority of clones struggle with these two, and the Family Game runs both of them as good as the real Famicom!
Overall, I give the NTDEC Family Game a 4 out of 5 on my Famiclone Quality Rating. It has proven itself worthy on the most rigorous tests, but its incorrect sound registers are a dead and loud giveaway of the system’s unlicensed past. Incorrect sound can be a non-issue or a big turnoff, depending on your tastes.
Fortunately the CPU and PPU chips are socketed which makes replacing them with original Nintendo parts a breeze. In part 2 of the Restoring a Nice Famiclone series I’ll extract the CPU and PPU chips from an authentic NES motherboard and install them in the Family Game to get rid of the incorrect sound and turn this nice clone into an “original” Famiclone!


28/11/2009 at 11:27 PM |
[…] Part 2 By 133MHz Finally! Here’s Part 2 of the Restoring a Nice Famiclone Saga. Go read Part 1 if you haven’t done so […]
26/02/2010 at 2:32 AM |
What’ up. I just want to ask if the AC adaptor for this system is the same as the one for the original Famicom. Can you use regular Famicom AC adapter with this system? The info for the Original is
AC 100V 50/60Hz 18VA
DC 10V 850mA (-) inside, (+) outside
Is this the same as the one for your Family Game here?
26/02/2010 at 2:45 AM |
Yes, the AC adapter is exactly the same. You can use a regular Famicom AC adapter with this system.
10/04/2010 at 2:20 AM |
Hi, thanks for the Ac adapter suggestion. Well, I feel like sharing my Famicom collection with you since I thought you have a Family Game, you would’ve liked to see more of these systems. You can check my Famicom Collection and become a follower at the following:
http://famicom-ner38073.blogspot.com/
10/04/2010 at 2:24 AM |
Thanks for sharing it with me. Your systems are in such a great condition, it’s so awesome! I have an original Famicom too but it’s nowhere as pristine as yours.
20/09/2010 at 6:34 AM |
Please can tell me what is the value of R1 resistor on the Famiclone that you extracted parts from? I have the “GLK-2001” (or 2016) type of the console that comes with a keyboard. I saw the same one on this forum, but on mine, the picture is going blurry when the first transistor get warm, i accidently burned my R1 resistor with a 12Volt power supply. So my question is what is the value of that resistor (it is located by the power supply socket) so i can replace it!?
If you reply to my question, can you do it on the: ljubisamandic@gmail.com
THX to anyone…
18/10/2010 at 10:09 AM |
I really enjoyed reading this article ! it reminds me of when i owned a gaming console like that one ! thanks for bringing back the memories
17/12/2010 at 2:48 PM |
Hello I got the same exact famiclone mine doesn’t work the power suply board started to throw smoke is there any place where i could buy another to replace it since this systems are difficult to find and real ones are expensive 🙂 can I get some help here..
Thanks
18/12/2010 at 10:02 PM |
Such a great question. I’m still left with one in my collection which I will be listing soon on ebay, it is very similar to this one, just that mine is in mint new condition with everything ready to play and manuals, with only box looking with some damage due to years of storage. Let me know if you want to buy it. You can see the ones and my feedback on the previous two I’ve sold. Have a great day.
Regards,
-retro4everfamicom
04/01/2011 at 6:18 AM
Cool do you still have it how much you selling this for ;).
Thanks..
08/04/2011 at 3:51 AM |
Moinsen!
I’ve got such this one since yesterdays. But on my system the pads have four buttons and on the frontshield of the system stands the name Nintendo. Unforunately the blue cartige slot is broken, so I’m looking for a spare part. Do you have a possible address? I’ve only this system, so I can’t take the slot from another.
Greets!
Merlin
25/05/2011 at 10:18 AM |
Moinsen again!
Now I’ve three of this famiclones: a taiwanese (subscribed above), a russian (Zoga) and a thailand machine. I’ve the original Famiclon and the disc system also. The thailand famiclone is a complete black system, but it doesn’t work with the Famicom Disc System….arrrgh. It looks so awesome…
Greets!
Merl
24/08/2011 at 6:11 AM |
Hey, I have a famiclone like that, It’s just it completely doesn’t have the power/av board. Are you skilled enough with backward engineering to do schematics of it?
31/08/2012 at 7:48 PM |
Hey! Can you please help me with my Famiclone?
Well, due to my complete ignorance and impulsiveness, I used a NES adapter in a Famicom Clone. I had both consoles for 20 years, and yes, I made this stupid mistake. Apparently I blew the Famiclone, although I only had the NES adapter connected for a few seconds. Next days, I bought and tried a universal adapter, and it did not work. Can my Famiclone be saved? Can be blown fuses be replaced? If in fact, that’s the problem.
This Famiclone of mine has a precious thing for any retrogamer. It contains 42 Famicom games built in the console. You just power on, and you have access to all of those. So, this is the treasure that I don’t want to lose. So, if there’s any chance to save my console, can you tell me ? It was my first console, and it still is my favorite. That’s why I got greedy and used the NES adapter…
And if there’s not a chance to save the console, is it possible to transfer the chip, or whatever it is, that contains the 42 games inside the console to another one, that works?
Thanks in advance!
31/08/2012 at 7:58 PM |
Most likely you have blown the 7805 voltage regulator and the main filter capacitor (if present). Both are cheap and relatively easy to source and replace, you just need basic soldering skills and equipment.
As for your second question, some clones have their built-in games as a Famicom board plugged into a second cartridge slot on the bottom of the main board, in those cases you can remove such board, plug it into another console and play the games. Others have the built in game chips directly soldered or bonded to the main board, if that’s the case they’re stuck with the console.
01/09/2012 at 10:03 PM
Thanks for your reply. So, I can save the system, right? That’s a relief. Although, I don’t know a thing about electronics and stuff like that. Is there any video on youtube or something, a tutorial, that can explain to me how it’s done? Do you think a professional could make it? Someone from a electronic store, or videogame store, I don’t know. Who should I call? I live in Portugal, not many people know about Famicom’s, or Famiclones, much less how to fix them!
Regarding my second question: My console has only one slot, so, that means the games are stuck with the system, right? I never saw systems with two cartridge slots, though.
Thanks again!
01/09/2012 at 10:23 PM
Check out http://www.famicomworld.com/forum, you’ll find several great people who can help you out. I’m a staff member there.
The second cartridge slot I was referring about is internal, not visible or accessible in any way unless you take the system apart. And by the way dual cartridge slot clones do exist, with both a 60 and a 72 pin slot in order to accommodate Famicom and NES games.
12/05/2013 at 10:14 AM |
Hi,
thank you for interesting article! I recently picked up one of these at a flea market (not knowing what it was). Mine is a PAL-B version, in good exterior condition, but lacks everything that is not firmly attached (ie no box, manual, or ac adaptor) and it appears to be very very dead.
Cartridge connector looks fine, so I suspect there is something wrong with the power.
Do you know if it is supposed to display any kind of picture when there is no cartridge inserted? (Like how an NES displays a blinking gray screen). That would be helpful to know when looking for the problem.
Cheers
13/05/2013 at 2:40 PM |
It should display a solid colored screen when no cartridge is inserted. Color may vary. Best to use a TV without blue screen when there is no signal, so that a solid blue or black screen from the console won’t be masked by it.
14/05/2013 at 3:02 AM
That’s good to know, thanks!
14/05/2013 at 6:29 PM |
hi man
nice article
i got a pal B version and its working great
i ordered an ntsc-j gamebut it didnt work
do you think the system is region lock if yes
how to make it play ntsc-j games
thanks in advance
14/05/2013 at 7:23 PM |
Neither the original Famicom or its clones are region locked. Try cleaning the contacts on the cartridge.
18/06/2013 at 1:03 AM |
Hi, i have the exact same one famiclone the problem is that i blew a cap the little one next to the power plug and the 7805. I dont have the value for that cap. Maybe you can tell me so i can restore my famiclone!! thanks!
18/06/2013 at 3:44 AM |
It should be around 1000µF 25V. Exact value isn’t critical so a higher capacitance/voltage rating will work fine.
20/12/2014 at 6:04 AM |
This is a really nice guide, could not help but buying the same clone on tradera (Swedish ebay).
But when I got it there was all sorts of things wrong. The picture is black and white, and reading your guide makes me belive its the “clock generator”.
That sounds pretty bad, will try to see if this could be fixed or not… I have another famiclone laying around but was hoping to get that one also working some day (had it for 20years now, haha).
So any chance of getting the “clock generator”
17/04/2015 at 2:42 PM |
hola amigos…bueno yo soloqueria hacer un comentario que bueno travesiando con las partes de este copia china de nes trabaje con el conector de video donde entra un acorriente de 9v,gnd,y video -y video+ asi hice un convertidor de rf a rca por
30/04/2016 at 10:33 AM |
Hi,
I have almost same console, and controllers in my console was dead. I wanna use another controllers, but I don’t know where is Clock gnd 5v latch and data on motherboard in 5 pin socked. Can you help me? PS. Sorry about my language, I’m Polish and my language can by bad.
28/08/2017 at 12:47 PM |
We have a PAL version.